This walkthrough shows you how to create your own PlantDemand API key — the credential you need before connecting any external tool, AI assistant, BI report, or the PlantDemand MCP server to your account. The whole process takes about five minutes and uses the built-in Swagger interface — no developer experience required.
What is a PlantDemand API key?
A PlantDemand API key (sometimes called an API token) is a long string of characters that lets a program — instead of a person typing in a username and password — authenticate to the PlantDemand REST API on your behalf. You add it as an HTTP header (SERVER_API_KEY) on each request, and PlantDemand recognizes the call as coming from your user account.
API keys are how the PlantDemand MCP server, Power BI reports, Postman collections, and custom integrations all read from and write to your PlantDemand schedule.
Before you start
- You need a working PlantDemand login (the same email and password you use at plantdemand.com/app/login).
- The API key you create inherits your user permissions. It cannot do anything you cannot do — and if your permissions change later, the key’s effective permissions change with them.
- Treat the key like a password. Anyone who has it can act as you against the API.
Step 1 — Log in to PlantDemand
Open https://plantdemand.com/app/login in your browser and sign in with your normal PlantDemand account.
Step 2 — Open the Swagger API Manager
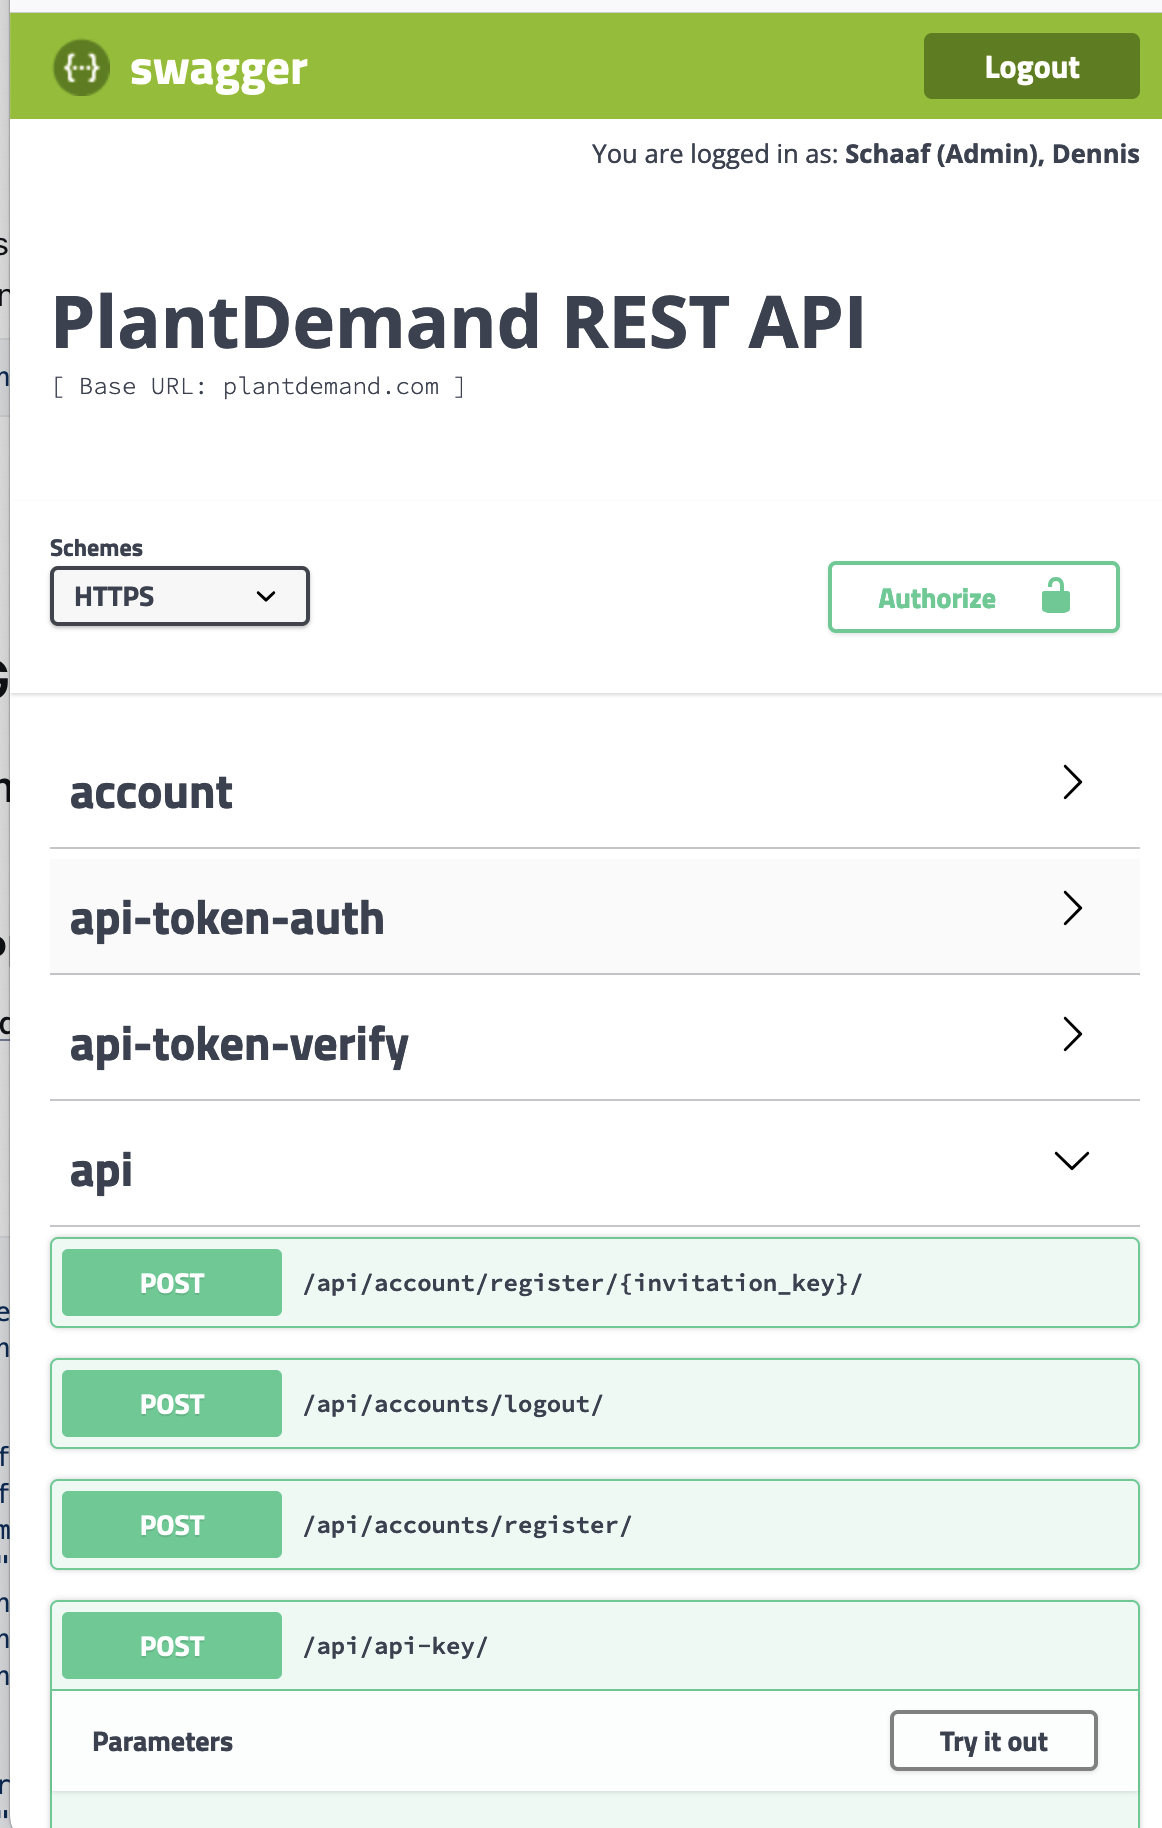
Once you are signed in, open https://plantdemand.com/swagger in the same browser tab or a new one. You will see the PlantDemand REST API page with sections for account, api-token-auth, api-token-verify, and api.
Step 3 — Open the POST /api/api-key endpoint
Expand the api section, then scroll down to POST /api/api-key and click it to expand. This is the endpoint that creates a new API key for your user.
Step 4 — Click “Try it out” and paste your key configuration
Click the Try it out button on the right side of the endpoint. The Example Value text box will become editable.
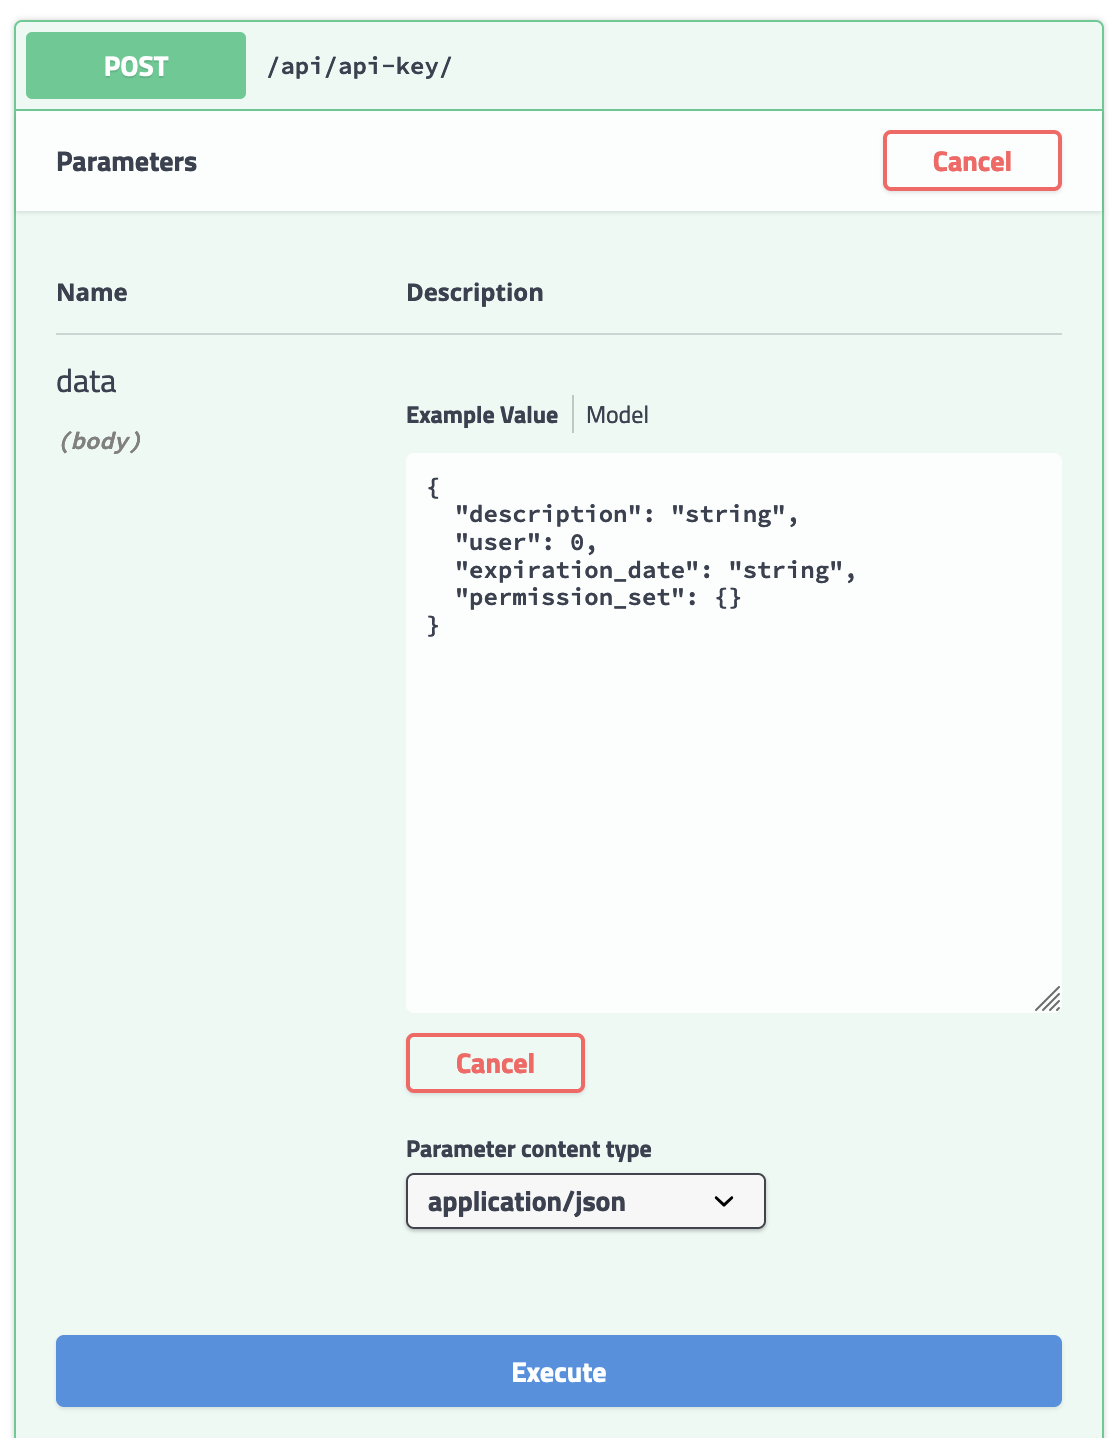
Replace the contents of the box with the JSON below. This is a starting point that includes most read and write permissions — you should remove anything you do not need (especially edit_users and any of the other edit_ permissions if your integration only needs to read data).
{
  "description": "Integration API Key",
  "expiration_date": null,
  "permission_set": [
    "edit_users",
    "view_plant_configuration",
    "edit_plant_configuration",
    "edit_order_form",
    "edit_materials",
    "edit_mix_designs",
    "edit_production_modes",
    "view_production_modes",
    "view_orders",
    "edit_orders",
    "create_temporary_orders",
    "view_customers",
    "edit_customers",
    "view_reports",
    "view_order_plan",
    "edit_order_plan",
    "create_order_request",
    "approve_order_request",
    "edit_order_request",
    "view_order_request"
  ]
}
Recommended: use least-privilege permissions
The list above is the maximum set of permissions. For most integrations you only need a small subset. As examples:
- Read-only AI assistant or BI report: keep only the
view_*permissions. - Order entry integration: add
view_orders,edit_orders, andcreate_temporary_orders; leave theview_*reads in place. - Configuration sync: add the relevant
edit_plant_configuration,edit_materials,edit_mix_designspermissions only.
You can always create another key later with a different scope — keys are cheap and revocable.
Recommended: set an expiration date and rotate
For better security, set expiration_date to a real date instead of null. The format is "YYYY-MM-DD", for example "2027-04-16" for a one-year key. Before the key expires, create a replacement and roll your integration over to it.
When expiration_date is null, the key never expires until you delete it.
Press Execute when you are happy with the request body.
Step 5 — Copy the API key from the server response
Scroll down to the Server response section. If the request succeeded you will see HTTP code 201 and a JSON response body that contains a value field — that long alphanumeric string is your API key.
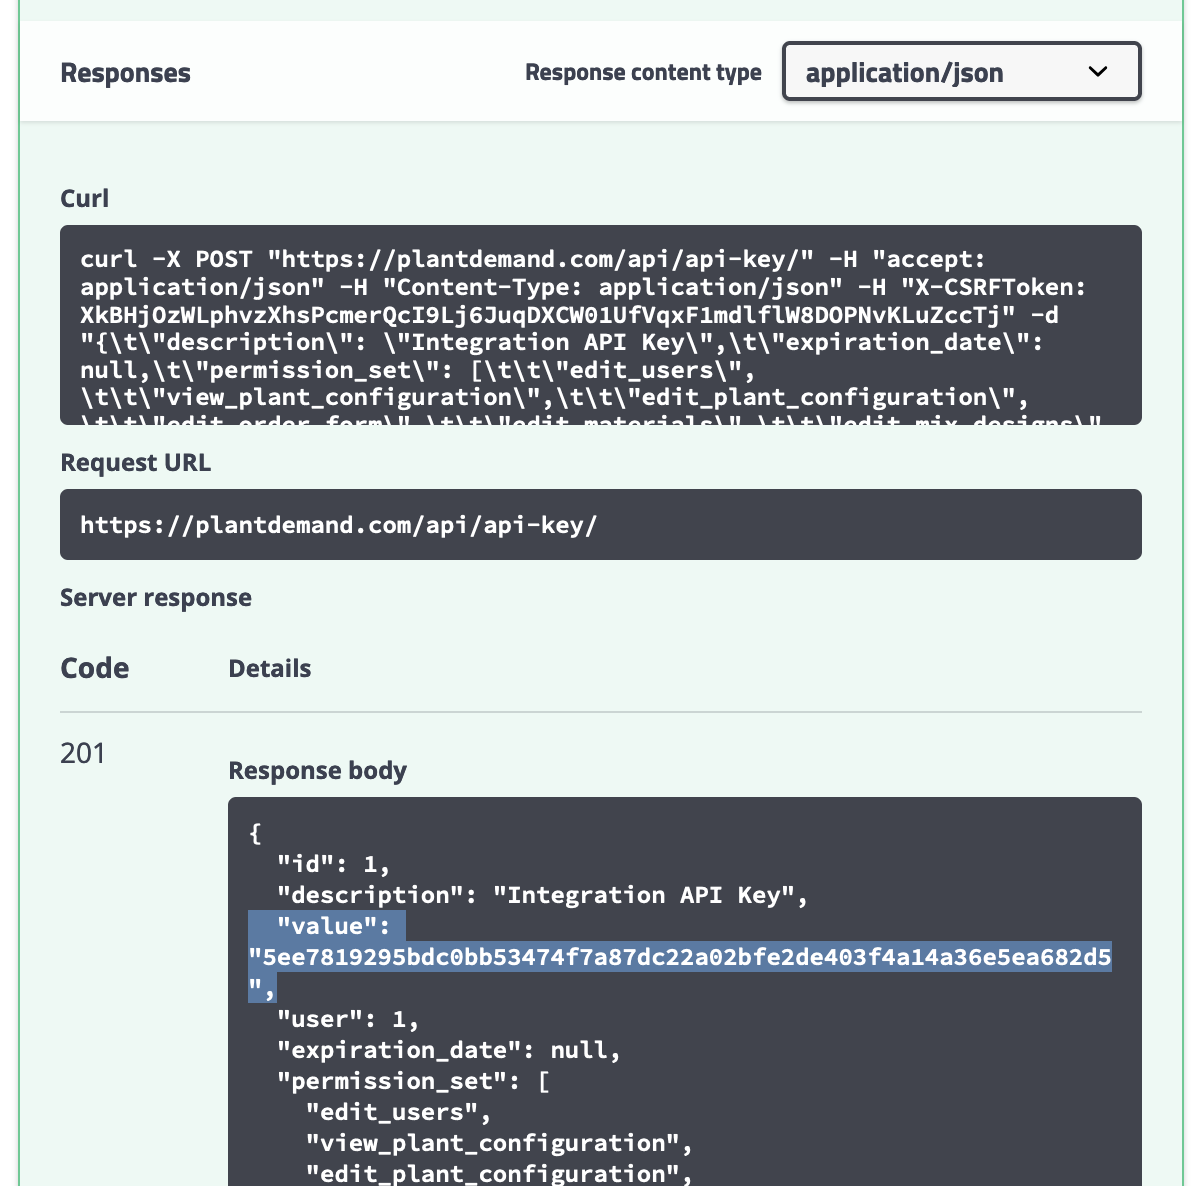
Copy the value somewhere safe immediately. PlantDemand does not show it to you again — if you lose it you have to create a new key.
Step 6 — Use the key in the SERVER_API_KEY request header
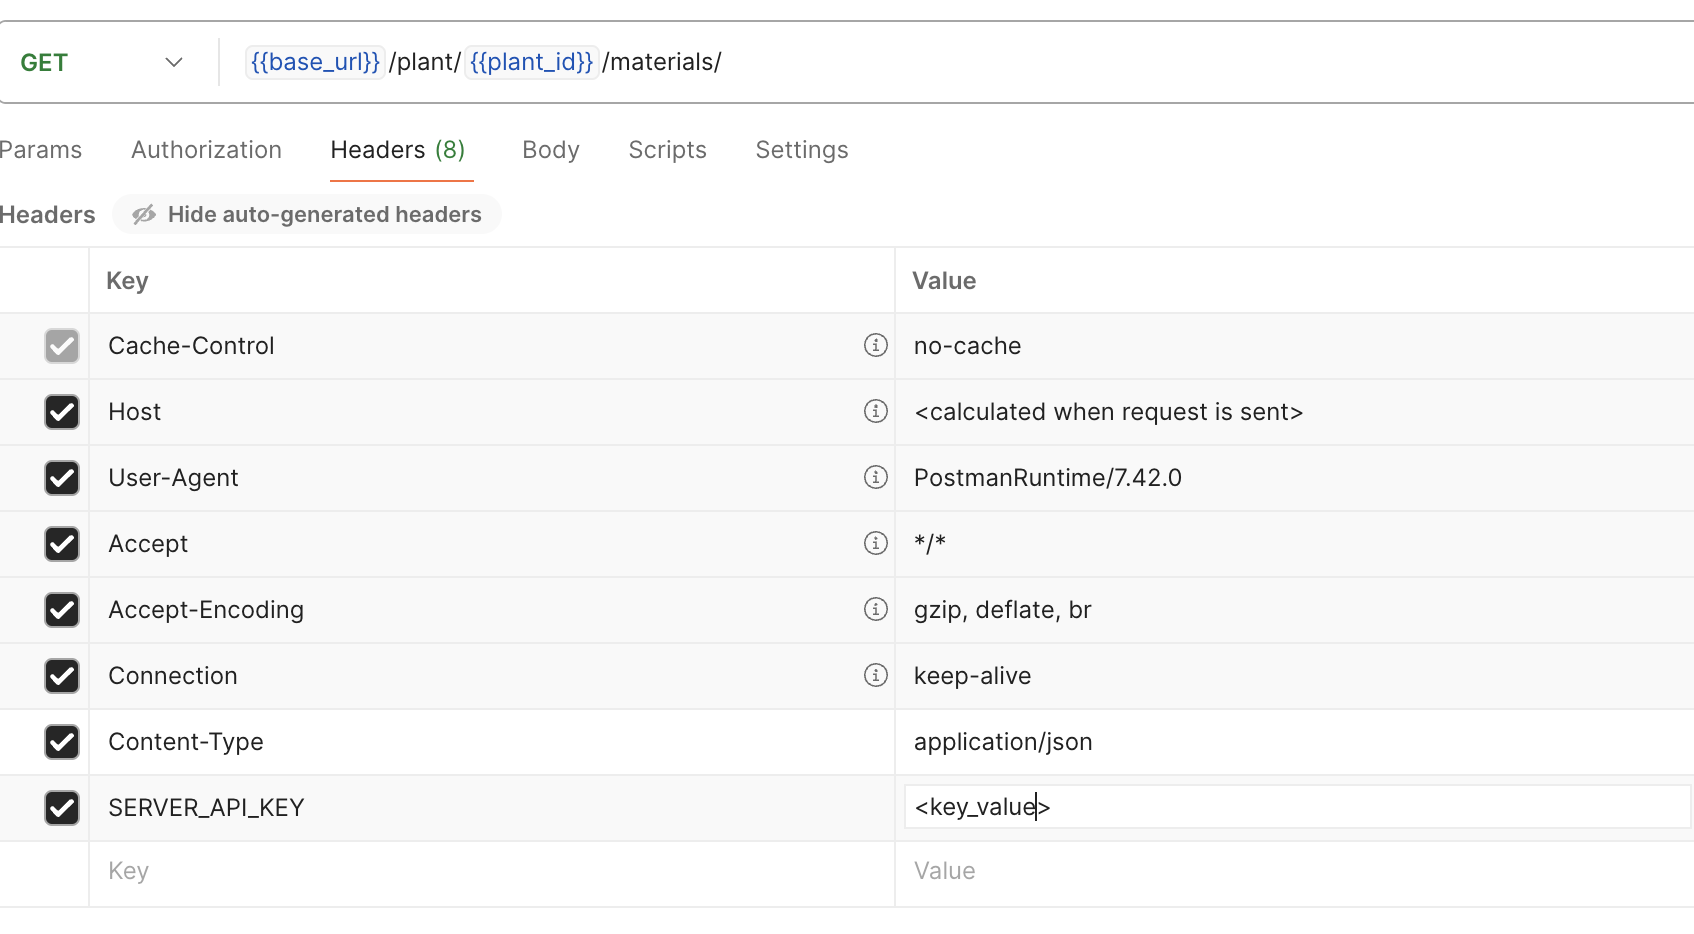
To authenticate any request to the PlantDemand REST API, set an HTTP header on the request:
SERVER_API_KEY: <your_api_key_value>In Postman, that looks like this:
If you are using the official Postman collection from the PlantDemand team, paste the API key into the collection’s variables instead — a pre-request script will attach the header automatically to every call.
Where to use your new API key
- PlantDemand MCP server — let Claude, ChatGPT, Cursor, Copilot Studio and other AI assistants query your live schedule. See the MCP quickstart for setup.
- Power BI integration — pull your daily order data into a Power BI report using the same API key.
- Custom Postman collections, internal scripts, or any HTTP client that can set request headers.
Troubleshooting: 403 Forbidden responses
If the API rejects a request with a 403, the JSON response body tells you exactly which of the three problems it is.
| Response body | What it means | How to fix |
|---|---|---|
{"detail": "API key expired"} |
The key’s expiration_date has passed. |
Create a replacement key and update your integration. |
{"detail": "API key authentication failed"} |
The key value is wrong, deleted, or pasted with an extra space. | Double-check the value and the SERVER_API_KEY header name. Create a new key if needed. |
{"detail": "You do not have permission to perform this action."} |
The endpoint you called requires a permission your key was not granted (or your user no longer has). | Add the missing permission to a new key, or grant your user account the permission and create a fresh key. |
Important notes about API keys
- Keys never grant more access than the user. If your user account does not have a permission, neither will any key created under it.
- Permission changes are live. If your user permissions change, every existing key created under that user immediately gains or loses the same access.
- Treat keys like passwords. Do not commit them to source control, do not share them in chat, and use a secret manager whenever possible.
- Rotate keys. Set an
expiration_date, rotate before it hits, and delete keys you are no longer using.
Next steps
- Connect to the PlantDemand MCP server with your new key.
- Follow the Power BI integration walkthrough if you need scheduled order data in a BI report.
- Read the MCP security overview to understand how PlantDemand protects your data end-to-end.
Frequently Asked Questions
Do I need to be a developer to create a PlantDemand API key?
No. The whole flow happens in your browser at /swagger using a built-in form. You log in, paste a JSON request body, press Execute, and copy the key from the response. It takes about five minutes.
Is it safe to give an API key the full permission list?
It works, but it is not recommended. The key inherits all your user permissions, so a leaked full-permission key gives the holder the same edit access you have. Always remove the edit_ permissions you do not need — particularly edit_users.
How do I rotate a PlantDemand API key?
When you create a key, set “expiration_date” to a real date such as “YYYY-MM-DD”. Before that date, repeat the create-key flow to make a replacement, update your integration, and delete the old key.
Where do I use the API key?
You attach it to every API request as the SERVER_API_KEY HTTP header. The PlantDemand MCP server, Power BI report, Postman collection, or any custom integration all consume it the same way.
An API token is the entry point to every Asphalt AI workflow that reads PlantDemand data — that overview lists the full set of use cases the token unlocks.
This guide is part of PlantDemand’s asphalt software hub for asphalt plant operations, scheduling, and sales management.